Create Clay Hats and Crowns!

Create  Clay Hats and Crowns!

Thursday, December 31, 2009

Lullaby League dolls moving along!


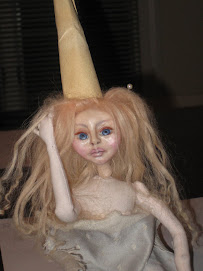
Moving along smoothly...I think it's the full moon! I'm on my last 2 dolls of the "lullaby League" Fairys from the wizard of OZ! I'm working on these dolls for the ART-IS retreat 2010. I completed the first doll...but the other two dolls that I origally started for this threesome...did not look like "lullabye Leaguers"!! haha But I think these two will be perfect. Sometimes I cant tell untill after I paint and Wig them....sometimes they Just want to be something else....

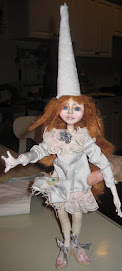
I also have completed four other head/bodices of Munchkin Fairies that will be part of this "Series".

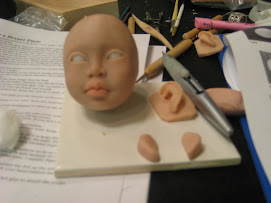
On the top Picture..I have sanded one of the faces..and the other one needs to be sanded. You can see the big difference, that sanding the paperclay makes.

Sunday, December 27, 2009

Merry Christmas SCOTT!!!


WHEW! I did it! Finished my brother Scott's "Daddy Doll" on Christmas eve...by the skin of my teeth!! But I was very happy with the finished doll....When i picked it up...it was soft and cuddly and the picture I used of my dad from his childhood really came to Life!. This doll is a symbol of the Love my dad gave to all of his children. He worked so hard, and yet he "played" with us and all of the neighborhood kids loved...JOE! He was always funny...even in church...when the collection basket came around, and he had to give each of us four kids a quarter...he'd give us funny things to make us laugh in church...a nail clipper, a nickle that squirted water...One time he found a tiny inch worm dancing on this ladies perfectly coiffed Behive hairdo in the pew in front of us..They are some of my best memories!!! haha!

His clothes are made from Velvet fabric that came from Elizabeth Taylor's seamstress' "stash". (my dad loved that actress), given to my by my friend Tery. I had to cut around the Gold embroidered name...but the velvet is exquisite..feels so soft! and his boots are made from thin leather with tiny buckles and clay soles. His little scarf is made out of Fabric that says...When this you see, Remember Me!"


He has a beautiful vintage metal heart bead hanging from his shirt...because he was "ALL About Love and Compassion" ....Always!

Saturday, December 19, 2009

Ornament Exchange


I attended the Neptune Christmas meeting, and with my camera in my pocketbook...I didnt take one picture!!!! You get so excited to see everyone and hear about what everyone is CREATING...before you know it...its time to leave...and you forget you even have a camera with you!

So, these are pictures I took of my ornament that i made, and my good friend heather received, a tiny chair. I used an EPB pattern book called "A chaititable affair!" and then I minimized the pattern and put my own "twist" to it. The tiny heart pillow was created with a heart stamp on fabric and sewing and stuffing!

I Received, as my ornament ...the beautiful blue and silver decorated cone.....I hung it on my kitchen wall!


And I received a "Special" ornament from my good friend Stephanie...She is the beautiful Vintage looking angel. I just love the felt backing and the vintage laces used!


And last but not least, I received a birthday present from my good friend Tery....the coolest little embossing machine! Its new by sizzix...love that it looks like a pocketbook!! and I also got a pair odf Beautiful leaopard gloves!!!! Love them!


Every ornament that was given was beautiful and unique...and I'm mad at myself for not taking pictures!

Tuesday, December 8, 2009

Trying to finish 3 Tiny Dolls


TIME is getting "Tinier and Tinier" as christmas is gaining! I'm going to have to start baking cookies this week or the kids are going to get really mad! So i'm just trying to finish these 3 Tiny dolls, along with an Ornament for an exchange at the neptune Meeting, and finishing My brothers "Dad doll" for his christmas Present ! TodayI didnt feel too good...sore throat and achey...so i was able to lollygag around in the shop in my pajamas...and I completed one doll, "The lullabye League" doll....and i put together ideas for the other two...the blue doll will have a Bird"s Nest hat, and The other doll looks kind of "Christmasy!" in Red.


For Lullaby league, I made a lot of tiny flowers from polymer with my tiny lilac cutters, and the color looked horrible pink when done...so i used my "NEW FAVORITE" color from Americana paint (99 cents!!! ha!) Melon, and this beautiful liquid gold leaf paint...I love what the flowers transformed to...i didnt even glaze them because they looked cool vintage after I painted them and wiped them a little with a paper towel...

Tuesday, November 24, 2009

Mixed Media Journal Page


So...I created a mixed Media Journal page for a "Healing" Journal for my very good friend Stephanie Notaski. Of course I was late for the "giving of the journal", But the page could be added into the book (I think!) .


I tore this apart twice, before I came up with the "Wired Semi- flat" paperclay doll! I created the Head/Bodice and put holes in the shoulders while the clay was still wet. I did the same thing for the arms...then I wired the doll together, using wire, metal findings and beads. I used alchohol inks and gilded rub-ons on the wire and metal parts to age them, and I tea stained her clothes. The Background Is white fabric and handmade textured white paper free motioned with white thread and THEN painted...this was a different approach Than using different colored fabrics and threads.
I learned the technique from a new book called Stitch, Cloth, Paper and Paint by Angie Hughes. This is a beautiful hard cover book that has fantastic pictures and easy to follow instructions.


Saturday, November 14, 2009

Painting with Lillian!


This week I had a painting class with Paperclay Artist Lillian Alberti ! She is a fantastic whimsical Artist and I adore her painting. She seems to make her dolls come alive with the paint....We had a great afternoon painting and chit chatting in her Lovely Home...and she made a "killer lunch" !


I'm so excited because I think I left the class with something that I did not have before...I've never had painting lessons, so I didn't know about blending and shading....and color mixing is tough for me...I usually end up with "MUD"! I think I get the "blending" concept now...I just have to PRACTICE it!!


I sculpted a bunch of paperclay head and bodices...and Lillian painted one of mine as she taught me...So we made collaborative art...my sculpts and her painting ! She kept the first head and then she painted another of my heads for me to keep as a reference of what I learned...the one "dirty little faced" child in the middle is my painting!!!

Wednesday, October 28, 2009

New Set of three paperclay dolls!


Today I strung the three new paperclay doll bodies.... theirHead with busts, arms and legs were sculpted from paperclay over styrofoam and foil and painted with acrylics. I sewed and stuffed their fabric bodies and attached arms and legs. I drilled holes in the shoulders and strung the arms through using heavy button thread. Then I glue gunned the soft body into the paper clay bust, after i removed the styrofoam and foil. I still had an ounce of energy...so I wigged them using dyed mohair. They were supposed to be halloween dolls..but i feel like its too late...i dont know...maybe they will be a different theme..I'll see how it flows!

Sunday, October 18, 2009

Halloween Dolls 2009


So I'm looking at my past two years of halloween dolls...and I'm trying to do something different. Here are my 2007 and 2008 dolls...and the START (kind of late!) of the 2009 dolls I have also made all of their arms and legs, I'll sew their bodies tomorrow!......
I only have an idea for one doll...hoping the other two will just floW!

Friday, October 16, 2009

Last of this Tiny paperclay doll series.......


These are the last 3 paperclay dolls of this series, "Children and their dolls".


The Little girl in the leopard outfit is a bit shy because she's kind of Odd looking, so she has a "Fox" mask. The Mask was formed from super sculpey and then "FLOCKED" with mohair that was dyed brown...i tinted the darker areas with watered acrylics.


The last two dolls are birthday twins with their mini crying babies and gingerbread cookies!

Sunday, October 11, 2009

ART IS in CT!


WOW!!!!! I went to ART IS in Connecticut for one day...oh, I think i'm going for all 5 days next year! It was really cool and my good doll friend, Minnie Curry from the Manhattan doll club is one of those "mover and shaker" people...so she introduced me to so many new people. It was just people taking all type of mixed media classes all over the hotel, eating, inspiring each other...and of course a cool "market place"!!!


I took the Lillian Alberti paperclay class. Lillian is a "whimsical artist" and her work was so inspiring! She brought so many Nursery Rhymes to life in a Wimsical Way....

Monday, October 5, 2009

Tiny Paperclay dolls ...Cupcakes and "Weirdo Princess"!


This is another tiny paperclay doll that is now complete. I thought her face was soft and sweet like a cupcake...so there you go!
Her Dress is sewn from vintage "flea market" lace..and the detail on her shirt is just watered down acrylic paints painted with a fine brush to bring the Flower details of the lace out....i coated this with a thick medium that dried clear. She has a tiny polymer "candy baby" with her...and she also has some of those same polymer candies on her outfit..they are coated with "triple thick"...my "new favorite glossy topping!" , and glass glitter.
Her cupcake hat is make out of polymer and Golden's "stucco" medium. I made the base, the cake part out of hollowed polymer, then added a little tissue paper coated with polymer medium. After that was baked, I "swirled" stucco medium, which was lighty and fluffy (a tiny bit gritty), just liked frosting! I painted, coated it with polymer medium and sprinkled with glass glitter.


Weirdo Princess's cat is fabric, coated with some paperclay to build up her face. She was sanded...painted and sprayed with "duncan porcelain" spray. It gave her a muted ceramic like look which I really liked because I had painted her too bright and glossed her...she looked, well, "not good"! Then I just took a chance and sprayed her with this "Porcelain look " spray...and it was exactly what I was looking for..a muted vintage look. Her collar is a string of vintage diamonds.

Sunday, September 27, 2009

Vintage Bebe completed!!


OK!! Vintage Bebe is completed.... the only thing i need to do is make an old raggedy teddy bear for her one "cyclops" hand...it will hide the hand and give her a little more charachter!


This baby is a little sad...it is kind of what i was going for...next one i will try an actual "pout" I knew i didnt have time in class to play with that...


Also...she has a bit of a "startled" look..which could have been avoided if i brout her eyelids a little more over her eyes. That tiny bit of white showing makes all the difference in the world.... i like large eyes and i was trying to open them more..a larger eye would have been the better option...haha!!!


Her clothes are all sewn out of Very old vintage pieces (shirts, collars, decorative mats) that i have collected from flea markets and antique shops. I had to be careful making her shoes...the silk material was so old...if you pulled it..it just shred into a handful of fibers, so i was able to save the fabric by brushing polymer medium on the back , making it sturdy and easier to form the shoe....The soles are polymer clay.


Saturday, September 26, 2009

Jack Johnston Class...creating a Polymer Premie baby

, Heather, Heidi,Tery, Sylvia and Myself with our "babies!


My "Poor Child"!


Working with Jared!


Tery's "Barry"


Joyce's
"chubby cheek" baby


Minnie acting like a "goof ball"

Tery, Heidi and Heather...Workin' it!!!


Heidi and Sylvia doing the dishes!


So ....our Jack Johnson class on creating a polymer premie baby has come and gone...after a Year of waiting! It was so far, my favorite class! We were a "family" of friends learning for 3 days (and nights!!!) and just being "creative together. Jared Johnston actually taught the class...he is the "Baby Lover" and he gave each one of us a lot of time teaching valuable techniques. He pushed us past the "comfort" zone...my comfort zone anyway....but i gained a lot from that.


For me to make a doll in 3 days is like REDICULOUS!!! but i did it! ....I see it's flaws (ugh!...they are magnified!!!) , but these are the things that i'll practice...So actually the flaws are the best part of this doll!! , they will be the thing that will help me to eventually be a better sculptor!


I am working on my dolls outfit and hair ...almost completed...thats another shocker in itself...because I dont finish a doll from a class. I feel like I learned on it and its just too "rough" to complete...I'd rather start fresh from scratch ... but this class i'm buzzing from.... I just have to complete this one!!!


Check out the weekend.....It was Fantastic!

Wednesday, September 9, 2009

Bee Girl...moving along on the fairies and their dolls


Two Fairies and their dolls are complete....bee girl and and her "LIL Sting" doll...and Girl fairy and her mermaid doll. The little "sting" doll is very tiny...but i think she is the right scale to be bee girls dolly. The mermaid is a bit too large..to be this little girls doll...but i'm tired...she will do!!! The rest of the fairies dolls will be made as tiny as the "sting" baby...i made a mold of her head...so i will be able to produce babies a little faster now! I did one other princess doll the same scale as the mermaid... she will also stay!
These two small dolls are named "Little KIMEE" dolls in honor of my sister Kim, who has a special place in her heart for tiny dolls and fairies.....

NY wow

NY wow
dIANE kEELER CLASS

Diane Keeler Class

Diane Keeler Class
Diane Teaching

Diane Keeler class

Diane Keeler class
Class Picture

Sculpting a Childs face

Sculpting a Childs face
My face ..Day 2 ..ready for EARS!

Working on a new face now!!!

Working on a new face now!!!
Completed face and breastplate

Attached head to breastplate

Attached head to breastplate
The clay is very dirty..the cleanest i can get it!

After Face Make up

After Face Make up
WOW...it gives a translucent glow...hid the dirt!

Removable wig...not styled or cut yet

Removable wig...not styled or cut yet
Goat mohair that was dyed and combed

Now she's styled!

Now she's styled!
But it is a wig...it will be glued when i'm ready!!!

Painted Face...still needs brows and lashes!

Painted Face...still needs brows and lashes!
She will be sealed with Duncan flat mat as soon as it comes in the mail!

Cloth Pixie body fit under breast plate...

Cloth Pixie body fit under breast plate...
After drawing and sewing a million body parts....

Girly girl "21" charms

Girly girl "21" charms
Angelica's 21st birthday charms

Devon with his creation

Devon with his creation
Devon and his monkey boy

Devons Doll that he made from a pattern

Devons Doll that he made from a pattern
Monkey Boy

another charm group

another charm group
Debbies Charm

Leapord tube charm

Leapord  tube charm
The diamond shape is a soldered glass bead.

Wax medium melted over polymer clay face....

Wax medium melted over polymer clay face....
She's getting there..i think this hair suits her better..she needs eyelashes and ears

Odd Vintage bug- like Fairy

Odd Vintage bug- like Fairy
Just the idea

Clay Window glazed with Utee

Clay Window glazed with Utee
Stamped Utee glazed "Charms"

Clay Charms

Clay Charms
Making a mold from a charm to make more charms!

Charming

Charming
Clear tubing and stamped Utee

Charming!!! ....REALLY!!!

Charming!!! ....REALLY!!!
Soldered Vintage photos

Charming!!! ....REALLY!!!

Charming!!! ....REALLY!!!
Soldered Charms

Journal Day with Tery and Stephanie

Journal Day with Tery and Stephanie
Creating an Art Journal

Stephanies journal

Stephanies journal
of course..completed first!!

New Art Journal

New Art Journal
Journal made from SCRATCH!!!

Art journal EMBELLISHMENTS

Art journal EMBELLISHMENTS
Clay, Stamps, Utee

Inside cover

Inside cover
Material and free motion stiching

Celeste

Celeste

Celeste up close

Celeste up close
Celestes shirt is made from gessoed and tinted lace with free motion embroidery

EVA

EVA
She is with her new mom Evelyn