Create Clay Hats and Crowns!

Create  Clay Hats and Crowns!

Wednesday, December 3, 2008

Mermaid Class


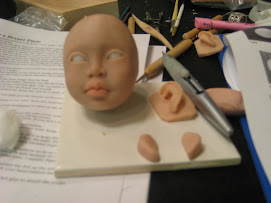
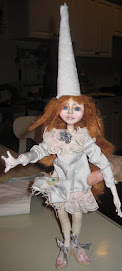
My Mermaid "in Progress"


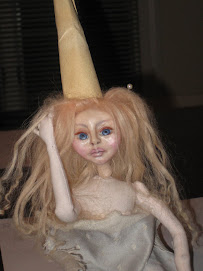
Stephanies "Soprano"
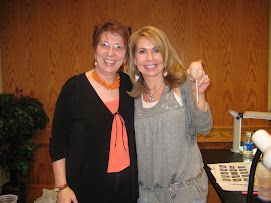
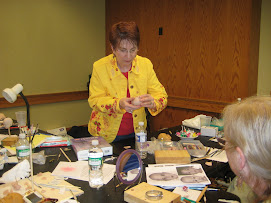
Last week A few of us from the club got together for a creative one day "Journey" to create a beautiful Mermaid Art Doll. The class was held up in the "shop" and Stephanie Novatski taught her "techniques class" for her beautiful "Soprano"!


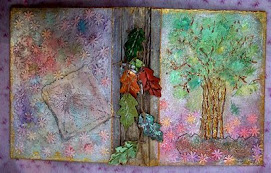
We learned some really "cool" painting on cloth techniques..such as applying acrylics to fabric through stencils, and doing "rubbings" onto the fabric using Shiva painsticksand (even crayons !!), texture plates..stamps..stencils. Is amazing how you can create a whole new fabric with these easy techniques! We also learned a "very cool" technique using a glue gun and dropping the hot glue in water and when cool...rubbing gold flakes onto the design..Wow...beautiful!


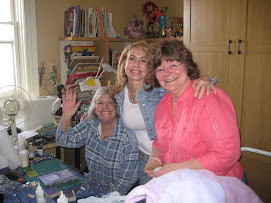
It was such a great day of inspiration and creative bonding! See the pictures of class and of my doll still in progress.


My mermaid will be holding a pair of pink ballerina shoes..and she will be "WONDERING" of the day when she will be able to "Dance"!
Her Tail is also "in progress"....i free motioned and "heated the edges to distort..then i rubbed some of the gold flecks onto the warm edges...now it needs some kind of "fluff"...added...right now its very boring! I need more "TEXTURE"!!!!

Sunday, November 16, 2008

Tiny Sculpted Fairy


Well I have been gathering sculpting books and dvd"s on sculpting "tiny" fairies and babies. I have just been reading and watching...and i finally got the nerve to try and work this tiny!!!

So this is my first "whole" body...which i never really wanted to do...because I dont like statues...but working tiny caught my interest...and I really loved doing it...to me...the face is way harder than the body! I thought it was going to be the opposite way around, so I was pleasantly surprised!

This fairy is about 2 inches...and not wanting to break tradition..her name is "Pink Thumbellina"


Her Wings are Free motioned with shimmery thread on a piece of organza over very pretty paper. I hit them with a heat gun to shrink and shape them a bit...then i rubbed Dorlands "WAX" on the edges to mute them a bit..and heated again. I made a purple pair of wings, but of course...the Pink looked better!) Her crown is clay...with tiny vintage diamonds...(the diamonds are on her outfit also)

I want to keep practicing this ...I think i really like doing the bodies..........

New Organizer!! ugh!


Well, I was in A.C. Moore trying to "Spend" my 50% coupon...and nothing was hitting me...i kind of have everything there!! hmmm.....Anyway..i decided to "cover " the whole store just in case...the cash was hot in my hand...I just needed to buy a "Craft" item! I turn down the BAKING isle...and there it was...it had a golden "aura" around it...and i swore i heard music playing...


I was a Wilton storage doohicky for baking..but i saw "clay" storage!!! man...this thing was cool, it was 59.99....with a coupon it was 30.00...WOW. As I sat on the floor pulling all of the drawers out...people were coming up up me... (with their 50% coupon in hand...) What is that? where'd you get it? ugh ...it was the only one ...I suggested to this one scarey lady...to go ask if they had more in the back....then i ran to the register and bought it! Check it out...I LOVE it!!!

Sunday, October 12, 2008

Open Barn Day


On Saturday, i went to Spruce Lane Llamas in Stockton NJ. It was "Open Barn" weekend!

It was so pretty and serene there and Bob and Carol Wolfe, the owners were warm and inviting. I went to purchase Llama hair...its so soft and pretty..I think its perfect for doll hair...The lama hair comes in pieces a couple inches long and can be needle felted onto a cloth doll head or Glued directly onto a clay head...or it can be glued or sewn onto a "Skull Cap" that can be attached to the dolls head like a Wig!


I really got to mingle with these amazing beautiful animals...they are very friendly! There were 2 new babies on the farm....see the pics.....

Monday, October 6, 2008

Tried some new hair


At the sheep and fiber festival...i really found some beautiful hair...i have been washing and washing blah blah blah...hair!!!! I dont think i'll ever buy unwashed animal fiber again...This is freaking work!!! Any way, some of the fiber i bought was clean ...so i tried a little on one of my halloween dolls that just didnt look right with her hair...I just "added this silky...glossy hair to what she had... I also dyed it a wheat color with some alchohol ink...which i definately wouldnt do again...because as we know alchohol dries things out...but even though this fiber got a little dried out..it still has smoothness to it...this hair is beautiful!!! See the pictures...its the doll on the right with the vintage lace,,,the girl on the left has real FLAX hair..(linen is made from flax)..i'm trying to figure out their halloween costumes!

Sunday, October 5, 2008

Bear doll completed


I was able to complete the "bear girl " doll....she has tiny "Ugg" type boots! They are all the rage with my daughter and her friends...... i was also able to complete the other two dolls feet!!!

Sheep and fiber festival !!!


Yesterday I attended the 14th annual sheep and fiber festival at the Hunterdon County fairgrounds. I believe it was a small festival...but it was vey exciting. I am so happy that i took this journey! The animals were so beautiful and i got to talk with so many friendly people who owned the animals. I met Bob Wolfe who breeds llamas...he has a business which you can find on line http://www.sprucelane.com/ . I spent some time with bob and 3 of his llama .....he really loves and takes care of these beauties....this was apparent in their soft shiny coats. I bought a couple of bags of their wool...its straight ..soft.and silky!! This will make the perfect "straight" doll hair!!


I also bought Alpaca hair which is also soo soft and silky but with a little tiny kink to it....its beautiful!!! this came from a very cute charming woman that owns a farm you can find at http://www.desaifarms.net/ !


I also bought a just cut fleece from a grey jacob ewe named Hannah..they even gave me her picture!!! but i actually dont know what i got myself into...just that it looked so different...i had to have it!!! when i got it home...ugh!!! its filthy greasy...poopy...and its not silky doll hair...it might be some type of "wooly animal hair...i guess i have to start making animals!!! ha! i will search the internet to see what i'm into.....


The last thing that i got was a "drop spindle".... a little hand held wooden tool that you can spin roving into yarn.........very cool...this company was http://www.eklectikaknits.com/

Wednesday, October 1, 2008

A Creative meeting


Last week I had the good fortune of getting together with my friend Susan from Portland Oregon.. (We met in the Diane Keeler sculpting class at the NY WOW). Susan's husband was doing business in Mahwah Nj...so i went and met her . We took a ride in the city to a very cool store called "The compleat Sculptor", and foundsome great tools and products...


Susan is a fantastic sculptor and had started with miniatures.....see her "ladybug queen" and "flocked Mini dogs....I'm very excited about the animal flocking...as she gave me a website of an artist that she learned many techniques from....the site is http://kerripajuti.com/ ....check it out...she is amazing

Tiny wispy bangs found in the woods!!!


So i'm working on these halloween dolls...and i 'm trying to wig them all differently....My friend Susan from oregon had given me some beautiful angora fiber...goat maybe?? i dont know but very soft...so i wig one of the dolls in this fiber...and its really pretty hair...as i'm thinking...this needs something else...i look down and ugh..my workspace is getting so cluttered...i push a bunch of "stuff" out of the way...ouhhh! i get stuck by this plant thing i found in the woods that has been sitting for a month...couldnt find a use for it yet...maybe i'll throw it out! Then...some of the fibers fall out...OH MY GOSH...its right next to my doll i'm working on...its the exact same color of her wig..holy crap...they are tiny bangs!!! not only that...they each have thier "own" follicle PLUG that you can glue to the dolls head!!!! They are in the woods!!! they are FREE!!! haha


Yes...its the little things in life that "freak me out" check out wha the plant looks like and how the wispy bags look.....

Monday, September 29, 2008

halloween Dolls


I am in the process of creating a set of halloween dolls. I made 2 original heads, two different sizes..and then i created a mold for each. It was easier to have a jump on the next dolls heads..manipulting the faces after they come out of the mold takes me anywher from 1 to 2 hours, so each dolls has its own personality....no two are exact!


I then created a body pattern.... borrowing the "but " portion from an epb pattern ....thanks elinor...for that great "shaped butt" ..i used armature wire in the torso...arms and legs and they are now poseable! thanks to my friend maria..."she said...giirrrrl...you've got to use some type of armiture in those dolls!!!"


i have wigged them all and i have completed 2 costumes... , leopard girl and strawberry girl.......I'm working on the third...bear girl.


i'm working production style with these dolls ...completing each section on all dolls before moving to the next thing....heads, bodies, faces, hair costumes..the last thing i wiil do is feet and shoes

Friday, August 22, 2008

Chocolate fairy


Finally!!
The Chocolate fairy is complete! I changed her original "strawberry blonde" curly hair do to darker straight pigtails....she became more "alive" for me with this hair! The techniques that i learned from the Diane Keeler class were a long slow road!!! Summer is a little difficult to be creative...but i got through !! This doll helped me to see what techniques i need to work on ...and what changes should be made for my next doll. Dont get me wrong...I am happy and excited about this doll.....but I know the errors Imade...and I will work on them for the next doll!

Fiber Textile class with Pearl Moon


This past weekend our doll club was lucky enough to be able to have Pearl Moon from Australia teach for a weekend. Pearl is a phenominal fiber artist and fabulous sculptor who displays her textiles on the doll form. She taught us as many techniques as she could in a weekend. We worked from nine in the morning until abouth midnight both days!!! We were on "creative overload" !!!! but we just couldnt stop working!!!

Most of the work was Free motion machining using different techniques with collaged fabric, fiber, paper, paints, foils and even sewing into "nothingness" ! What looked crazy in the beginning became beautiful works of fabric art for every student! It was an amazing weekend....and we even got a few extra days with pearl to shop for more "ART" stuff...and play with clay and stamps....

Also, we had a short visit from Gloria Winer ! Gloria (GLOWIE) brought her latest "Male form" doll.....he was fantastic!!!!

After the weekend was over ... I really felt fulfilled and thanked Pearl for the wonderful gift that she gave to all of us!
The attached photos includes some of Pears textile dolls and a picture of gloria with her latest "Male" doll....awsome!!!!

Saturday, June 21, 2008

New York WOW

I attended the NY WOW last month..and i am working on what i learned since i got home (whenever i can get that creative time!) I attended four days and decided on taking all of Diane Keelers classes...every day was fantastic and i could just about fit everything i learned into my brain....by the last day....I just had to get home To "get to it!"
The first 2 days was sculpting a childs face, then the third day was sculpting "HANDS" and the last day was making a WIG CAP. At the end of the very intense faces class...Diane Demo'd how to make a breast plate, and a moveable head....and how to paint the eyes. She shared so much knowledge and she explained that some of it were her own techniques and a lot of it was taught by teachers.....she was such a relaxed teacher...i believed she inspired us all to bring out our own creativity !
Even though I did not want to part from Diane and all of my new friends (and some old...Gloria Weiner ...it was great to be in her aura!!!) ...i knew it had to end and i also knew that i was starting on my new journey!!!

Thursday, May 8, 2008

Nephew Devons doll

hmmm...ya know i just realized...(probably because it was my Nephew Devons 15th birthday...that i didnt remember until AFTER he went to sleep last night!!!!) , that i never put the doll that HE MADE up....so here it is! This kid is an artist...he draws and creates all of the time....just like his aunt col!!!! (i think he's a little more ahead of the game at 15!!!)

Anywaydevon is very good at drawing...he has even started a little business doingdesigns on skateboards.....this is his first doll....i love it!! We will be making more down the shore this summer.......check it out

Scotts "Dad doll"

Finally finished my brother scott"s "Dad doll". This is my dad as a kid...he's holding some string beans and a tomato because thats what he loved...his garden and tomatoes! I made him as an angel...because all of us kids know thats what he is now....helping us along on our "earthly journeys".

I know this doesn't look exactly like the picture i had of him...but he came out a little older...so this is what i imagine him to have looked like at the time. This is just for scott to have a little spirit doll when he just "needs to connect" to his dad, who loved him .... And it is also a subtle reminder to always keep a small part of ourselves child-like (just like our dad....always looking at everything in life as a "funny" thing !!) no matter where we are in our lives !!!!

Another charm group

ok...i worked a little more on charms...soldering is getting a little better!!! and i figured out another cool little soldered charm to make..... i had some leapord glass charms...they were small thick squares....i copper taped them and then soldered ....i added a jump ring on a corner so it appears to be a diamond shape . I wanted it to look a little more vintage so i used alchohol ink in gold to color the solder...to match the other things that were going on in this charm group. I also made the tiny "vintage" tag out of very thin clay that was cut out on my sissix machine....then stamped....baked...and "utee" thick clear embossed. This was a "commisioned" charm ...woo hoo!!!!

Monday, April 28, 2008

Working a little more on charms

Yesterday i worked a little more on charms...practiced soldering a little more....and i found that if that tape is not on the soldered item correctly...FORGET IT! the tape can bulge out,,,be very wrinkled or rip....and the solder goes on as smooth or bumpy as the tape is applied! So take time to burnish the metal tape onto the item correctly...this will save a lot of time (and heart break!!!)

So....i wanted to get a little different look attached to my charms...like smaller charms attached to bigger ones...so i had some sqaure GLASS BEADS...in leapard print....i taped them nice and smooth and soldered...then i soldered the jump ring to a corner instead of in the middle and it looked more like a diamond than a square shape.....i love thisnew tiny hanging charm...now i will search for pretty flat glass beads to solder.....thet have a lot out there now.....check out the picture ........

Today is "back to dolls" day!!!

Friday, April 25, 2008

Charming!!! ....REALLY!!!

Man....i got on the Charm wagon...i dont thinking i'm getting off soon!! This was such a learning experience and i cannot stop trying new ways to make these cool little embellishments for ...well...i dont know....i guess they could be for EVERYTHING....

So.... instead of going for the new L Vuitton pocketbook for my anniversary...i got a new Soldering setup....a circle (lens) glass cutter....a glass/clay grinder wheel...and a new heat gun.
My husband taught me how to solder and cut glass...squares and circles! i'm going to need a bit of practice...but what i did was pretty cool. I learned a lot of cool things from a book called Pretty Little Things...the author made some amazing things and it totally inspired me.....

I also made some charms out of clear rubber tubing......and stamped images on clay and painted watercolor paper that was embossed with clear utee embossing powder...see the attched "Charm" photos

An ART JOURNAL

well...its the end of april already....and i have been LOST in art....last weekend i got together with Tery and Stephanie to create a JOURNAL book. We made them from scratch with canvas board. I created my cover by taking 2 pieces of cardboard and covering them with paper that i treated and embossed, also material that i free motioned and stained....and then glued the covers to a spine ....adding the paper "signatures" with a piece of dyed ribbon. Embellishments were made out of clay....paper...utee...stamps and paint/inks/metalic powders.

Now the pages will get filled in with Art Charms.....!!!!!

Saturday, March 22, 2008

Wax medium melted over polymer clay face....

I started an idea for a doll i've had in my head for a while....i want her to look old...and a little beat up...SO...i put wax medium on her face AND HEATED IT WITH THE HEAT GUN....HMMM...I CANT TELL IF IT WILL EVER REALLY DRY HARD.......she will be a very odd...kind of alien like ..i still have to add her ears...and i dont think this hairstyle is working with my idea...(i keep doing the same thing....gotta get out of this) ....She has a pointy vintage hat...i just rolled some tea dyed paper to get the idea...but i will do the real hat in textured clay...and walnut stain it....i have a lot of pieces of old lace and I FOUND a piece of really odd worn blue satin material..with little textured dots....this will be her dress. ok...she is a small doll...a picture is attached ( now, this is only the idea...just starting to take on some life....)

Wednesday, March 19, 2008

Garden State dollclub meeting

Last week I had the opportunity to be a visitor at the Garden State March doll club meeting. I was invited by ...Diane Kearny.....a very talented doll artist , sewer, quilter.
Members brought in completed dolls...dresses and fiber art...We sat and chatted about art while we created a hat from a doll magazine free pattern....it was a great day of connecting with all of these talented souls! have attached some pictures of that meeting, the women and some of their work....

Stephanies beautiful cat doll

wowee...this is stephanies doll from her original pattern that she sells....hmmmm she must be rich now!!! check it out......

Tuesday, March 11, 2008

weirdo vintage magnet

OK..this is my last magnet...I used a technique that is from a Sherrill Khann book. I stamped fabric...this was coffee dyed...then i used some flat pink paint all around the image....i sewed on the outside lines...and stuffed her. Then i embellised with some old ribbon...a button from a mold i made from a bracelet(i used light green clay....then painted it that same light pink ...i then distressed the button using temporary quilting spray...then used Ranger distress powders in tattered rose...and heated...ohhh!! it comes gritty and distressed looking...i put a little gold rub n buff on the edges....Now...i sent for the coolest Metal Powders...from the Clay Alley website....and edged the cards. this powder is so cool..it really takes on a very "metal look" .......I stamped the word vintage in a mauve chalk ink...then i used ranger white frost embossing powder...this looks so Cool!!!

Monday, March 10, 2008

Where has this fiber art inspitation come from???

Well... i have to tell you...at first it was just making dolls....dont get me wrong..The Doll is my ultimate first love!!! But we had a new member join our doll club. Well...she's a new member for us...but not new to dollmaking and fiber art. Her name is Stephanie Novatskie (hmmmm...spelling??!) and she has been doing it all! Stephanie has inspired me to really step out of my little cocoon and learn "everything"! I am diving into fibert art and mixed media......clay, which is my main love that got me into dolls....., stamps....ohhhh the stamps.....i'm going broke and running out of shop space!!!!! embossing...blah blah blah.....!

Well....i'm telling you this because there is always someone new to let into your life to inspire you.....there is always a new door to open to allow new creativity to flow in.....and there will always be beautiful art friends that you connect with for life. With that being said....check out an amazing hand made gift that stephanie made me that totally got me creating in overdrive!!!!!

Vintage button magnet

This magnet was made using a sissix frame cut out of batting...the color and texture gave it a vintage feel...i stained it a little with walnut stain. I freemotioned around the frame making little circles....that ended up looking like roses, then softened the whole thing with a piece of ivory tulle........I then ran it through the xyron machine with the laminate/magnet cartidge....only the tulle did not like the laminate...wouldnt stick!!! hmmmm i thuoght it laminated everything!!! oh well...i removed the laminate sheet and it actually looks better...like a tiny quilt with a nice feel! I used a mold for the doll parts....and then i used rubber stamps in colored polymer clay (they were highlighted before baking with sparkly powders) for the wings and crown......Lotsa techniques here! good learning experience......

Wednesday, March 5, 2008

The KEY to the GATE of my SOUL

i hung out in my shop most of the afternoon today....it started out really clean...and it now looks like a bomb hit it! But... i was in creative MODE! i just kept trying new things...if i failed ...i tried it again....that is very good for me...getting frustrated and stopping is a big problem i have....

OK...anyway...i told my friend evelyn that i would make a pin or magnet for an upcoming charity event she is helping with...i believe it is for senior citizens! Evelyn had made some really cool pins that inspired me...so it started out as a pin...but ended up a magnet... well whatever.... i"m very happy with the results!
I used so many techniques and things in this project. I used a new mold i bought called "Dolly Dangles" then tweaked it so it would look different....i used a wing and crown stamp and embossed it on felt with gold utee powder.....i had a piece of beautiful vintage material my friend tery gave me for the dolls dress....i used my new xyron machine to laminate/apply a magnet to a "fence" stamped image on heavy paper... i added sparkles...rub and buff...genesis paints on her face and i burned her tulle underskirt....i had to make her vintage!!!!

Monday, March 3, 2008

making 2 part slicone rubber molds

man...i love this stuff!!! now i am running all over my house looking for cool things that i want to "make a mold" of!!!! All you have to do is take equal parts of 2 different color putties and mix them together..(QUICKLEY) until they are a uniform color...then cover the object you want to make the mold of......wait about 10 minutes for it to set...and you have the same detail as the original in a mold!! now you can reproduce that "thing" as many times as you like!!!

i made molds of stamps.... charms...fancy buttons....my original face sculpt that i liked...blah blah blah....whatever!!

here are a couple of pictures of the molds and the dulpicates made. you can actually make the duplicate better than the original by tweaking the clay after releasing it from the mold...or by painting it...or using sparkley powders or glitz and glitter!!!

Sunday, February 17, 2008

Fiber Art weekend at Stephanies

Last Weekend was a fantastic learning get together for fiber art and mixed media. Myself , Tery, Evelyn and Heidi all went to Stephanies house to do some cool mixed media stuff. We made journal covers by first collaging a bunch of beautiful papers onto pieces of muslin, adding shimmer and color all through. While we let them dry...we started creating beautiful embellishments using stamps..clay...fun foam...utee...vellum....fibers and the Diva Cord Maker! and many other things!! Tery made a beautiful cord and now she has it down pat!!!

We finally went to bed after midnight!!! And then got up the next morning (no time even for showers!!)...finished up the journal covers and then stephanie took us right into making beautiful glimmery shimmery material for a pocketbook....we had to do the rest of the work at home...and they are still works in progress...using free motion embroidery and sewing beads and making cords. We were all on "creative overload" that afternoon....it was fantastic...see attached pictures...

Saturday, February 2, 2008

Heidies Doll

Heidi is another very talented doll club member...and actually my very first doll teacher. Heidi taught me a pretty basic EPB doll at the Pocono Sew and Vac. After that class a friend of hers knew that Elinor Piece Bailey was going to teach a class in NJ...so that is how the both of us hooked up with Tery and the newly formed Sew Sew Doll Club (who hosted the EPB weekend) ...The class was fantastic...and we have gotten together every month since that weekend ! Here is Heidi's latest creation... Crow baby ...she made this from a pattern by Ute Vasina....it is absolutely gorgeous!!! See the attached photo ....

Tery's Doll

Today i received a picture of a precious original doll named Annie from my friend Tery. She is so energetic and excited about making dolls! She is actually the founder our club ... The sew sew doll club! Tery is a talented "mover and a shaker"....ugh...sometimes she makes me tired......but i love her!!! I have included the picture of "Annie"

Thursday, January 31, 2008

Evelyns Masked doll

I am trying to get all of the talent from my doll club onto this site little by little....so here goes!

I mentioned my friend Evelyn...she is the one that i had for my grab bag person...I made her Eva. Well, making a doll for her was like taking a doll challenge...it was kind of like knowing that the doll would be magnified under a really good microscope about a million times!!! Not because she's picky or rude (actually she's pretty quiet).....no...its because she is a perfectionist sewer and ...well you know how it is!!! so here is one of her newest creations.....I love him...and I love his mask....actually I asked her to do a tutorial on creating the mask....

Wednesday, January 30, 2008

Using plastic or glass eyes

I really wanted to start using EYES ...instead of drawing/painting them in (even though i love the control i have with this technique...) I feel like the real eyes help the doll look a little more real life than whimsical....If thats the feeling i"m trying to get across when i create the doll...
I want the flexibility of either look. well.... I find out its not as easy as it looks....(for me anyway!!!) The first doll i did was totally cross eyed...I threw her away!!! i cant even show her because she's in the garbage!! ... The next one i did....I feel like her name is CELESTE...well her head got very big...because i needed to bury those eyes...so they were'nt popping out of her head! well..i ended up making her body bigger..and i was happy when she finally "pulled together..." haha

I'm using plastic eyes while i am learning so i dont blow a ton of money on glass ayes....I am using paper clay...so i dont have melting issues. But i did run into the plastic losing its finish by the time i was done sculpting and skinning the face. To try and correct this ..i was able to add shine by applying Ranger gloss to just the eyeball color...it really worked well!

I am also seeing that I have a woderful blank stare going on with this type of EYE...but its the journey!!! RIGHT?? because now i will concentrate on facial expression...instead of a nice "stare" !!! well ...we will see...haha

Here are Celeste and my last doll....EVA....she was my christmas grab bag doll for my friend evelyn....Evelyn is by far the best doll maker....She has fantastic imagination..and her work is precision with a needle and thread....I try and learn as much as i can from her...as well as every person in my dollclub!! Each woman in the club has a stong and inspiring gift to give the rest of us...ok...i'm really rambling....here are the pictures........

Monday, January 28, 2008

As I continue to take many inspiring classes with amazing teachers....EPB, Gloria Winer, Sherry Goshen, Patty Culea and Arly Beryhill....I am now really appreciating this form of art. I am finding that any medium I learn to work with could be used within the doll form.

The other thing i quickly learned is this....I CANNOT needle Sculpt!!! It just doesnt wotk for me (I kind if "rig" things with needle and thread...nothing is precision with me) ....but i did find my way to CLAY! I love clay....I can get lost in it for hours! I tried complete dolls out of clay...but they feel too "statue like" to me so I settled on cloth bodies with clay heads, and a mix of either cloth or clay hands. I did paperclay and then "skinned" them with cloth...and i love smoothness of the cloth but the precision of clay features!

Here are some completed dolls with painted eyes.....

Sunday, January 27, 2008

Beetle Babe challenge

Last Year after making my first two dolls,i decided to enter a doll challenge. It was called the beetle babe challenge. I really had a tough time with this doll ...and i tried so hard...but after not winning I realized how much i really did learn in the process.

NY wow

NY wow
dIANE kEELER CLASS

Diane Keeler Class

Diane Keeler Class
Diane Teaching

Diane Keeler class

Diane Keeler class
Class Picture

Sculpting a Childs face

Sculpting a Childs face
My face ..Day 2 ..ready for EARS!

Working on a new face now!!!

Working on a new face now!!!
Completed face and breastplate

Attached head to breastplate

Attached head to breastplate
The clay is very dirty..the cleanest i can get it!

After Face Make up

After Face Make up
WOW...it gives a translucent glow...hid the dirt!

Removable wig...not styled or cut yet

Removable wig...not styled or cut yet
Goat mohair that was dyed and combed

Now she's styled!

Now she's styled!
But it is a wig...it will be glued when i'm ready!!!

Painted Face...still needs brows and lashes!

Painted Face...still needs brows and lashes!
She will be sealed with Duncan flat mat as soon as it comes in the mail!

Cloth Pixie body fit under breast plate...

Cloth Pixie body fit under breast plate...
After drawing and sewing a million body parts....

Girly girl "21" charms

Girly girl "21" charms
Angelica's 21st birthday charms

Devon with his creation

Devon with his creation
Devon and his monkey boy

Devons Doll that he made from a pattern

Devons Doll that he made from a pattern
Monkey Boy

another charm group

another charm group
Debbies Charm

Leapord tube charm

Leapord  tube charm
The diamond shape is a soldered glass bead.

Wax medium melted over polymer clay face....

Wax medium melted over polymer clay face....
She's getting there..i think this hair suits her better..she needs eyelashes and ears

Odd Vintage bug- like Fairy

Odd Vintage bug- like Fairy
Just the idea

Clay Window glazed with Utee

Clay Window glazed with Utee
Stamped Utee glazed "Charms"

Clay Charms

Clay Charms
Making a mold from a charm to make more charms!

Charming

Charming
Clear tubing and stamped Utee

Charming!!! ....REALLY!!!

Charming!!! ....REALLY!!!
Soldered Vintage photos

Charming!!! ....REALLY!!!

Charming!!! ....REALLY!!!
Soldered Charms

Journal Day with Tery and Stephanie

Journal Day with Tery and Stephanie
Creating an Art Journal

Stephanies journal

Stephanies journal
of course..completed first!!

New Art Journal

New Art Journal
Journal made from SCRATCH!!!

Art journal EMBELLISHMENTS

Art journal EMBELLISHMENTS
Clay, Stamps, Utee

Inside cover

Inside cover
Material and free motion stiching

Celeste

Celeste

Celeste up close

Celeste up close
Celestes shirt is made from gessoed and tinted lace with free motion embroidery

EVA

EVA
She is with her new mom Evelyn