Create Clay Hats and Crowns!

Create  Clay Hats and Crowns!

Thursday, March 26, 2009

PA Field trip to the Stacy Clark Doll Exhibit


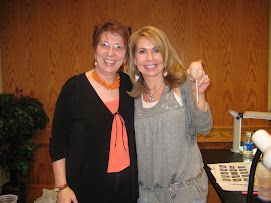
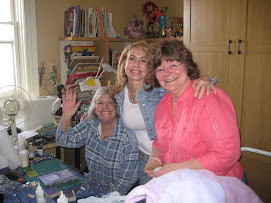
Last Sunday and Monday , Tery, Stephanie and myself took a trip to Heidi's house in Pennsylvania. We had a beautiful lunch that Heidi made for us along with Stephanies famous totellini soup!! Actually Heidi made a fantastic soup with potatoes and kalbasi..I had both!


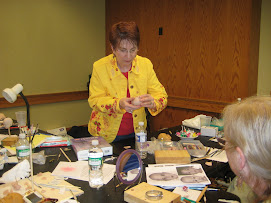
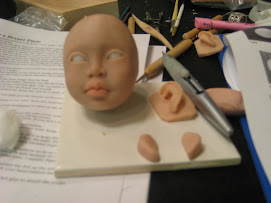
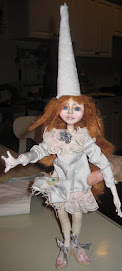
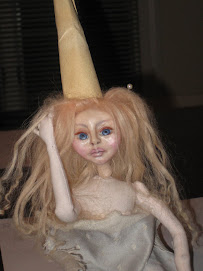
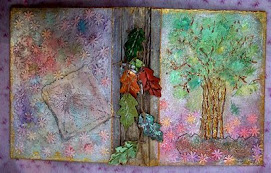
Our main plan for the get together was to visit the Schwenkfelder Library and Museum to see a doll exhibit by an artist named Stacy Clark. When we arrived...Stacy was there to meet us. WOW....you must "FEEL' this exhibit...that is what i did when I saw it..I "FELT" the Artist's energy and creativity.... As Stacy explained how she Might touch people of all ages with Her "Fairy Tale" dolls.... my eyes filled up and I got a lump in my throat..because I understood so clearly that the younger children BELIEVE , and the Older people REMEMBER , and the "tweeners" in between are HOPING and CREATING. Every where you looked tyhere were dolls, and when you thought you saw them all...you magically found another to see. Stacy used some very cool techniques to create texture in her dolls and animals and clothing. The Visit was breathtaking and inspiring and i'm so happy that I made the Journey. Check out the pictures, but you need to go see this !!!!
We went back to Heidis...oh, we stopped at DQ by my request, and then we ordered Pizza for dinner.....followed by a Ribbon Rose class that Stephanie gave...little kits and all!!! It was a real Party!!! haha
But on Monday we went to a "two Guys" type store named JoMar....(remember Two Guys)"??? ...and much to our amazement...we found some awsome fabric, lace and trims. at "amazing " prices!


Pocono Sew and Vac Bernina "Brush up" class!

Last Monday...I met my good friend and artist "Heidi" at the pocono sew and vac in stroudsburg PA. This is my favorite sewing store in the "UNIVERSE"!!! They carry every Known machine and there is someone in the store that specializes in each machine to demo it or even help you after you bought it!!! They never make you feel uncomfortable when you need help...they are always there...like "family"!!! Any way, "lovely" Ellen taught the class and I walked out of there with a lot of knowledge...we had a "blast" too!

My favorite Power seller salesperson...PAUL...was there to make us smile. Paul...WILL sell you any machine for the BEST PRICE possible!! Here he is hanging out in the store!!

Varrigated acid dying at the Spinnery


Last friday..i took an acid dying class at the "Spinnery" in Frenchtown NJ... The store is filled with all kinds of beautiful fibers in their natural color, just waiting to be dyed! Of course there are tons of vibrant and "textured" yarns also, along withdying, felting , knitting and spinning supplies !

There were only two students in the class...so we got to explore a little more and had a lot of extra attention! We learned some varigated dying techniques, and Betty, the owner enthusiastically shared all of her knowledge.


Saturday, March 21, 2009

Shoe Tutorial Prt two!!!


ok...so now your soles are made...place your dolls foot onto the sole, making sure it will work...i always make sure the shoe is a little bigger that the foot...i dont like chopping their feet off because the shoe is too small (which i have done...doesnt feel right!)


ok..so now..i take a paper towel and drap it over the sole, giving it plenty of room for the foot to go in, then i trace the upper shape , following the sole shape, but making it a little bigger, so that i have
fabric to glue to the inside of the sole.
I cut out those pieces, also
cutting the hole in the middle where the ankle will be. Then I clip very small cuts so that the fabric will lay nice and "mold" smoother. I start at the toe of the shoe with a dot of fabri tac or zap a gap, depending on what type of fabric i am using....and glue the "right" side of the edge of the fabric...then i follow around the first side....the second side will be trickier...this is where i use a "a long needle tool" (oh yeah i sell these $ 2.00!!! Hmmm...) anyway, to get inside of that shoe and press the edge NEATLY onto the sole. You can get fancier, using two pieces of seperate fabric for the upper...or make an easy slip on., Boots.....ENDLESS POSSIBILITIES!

Monday, March 16, 2009

Shoe Tutorial...Kind of!!!


OK...lets try this again!..I have a written insruction that i can email whoever wants it, Tracy, I already sent yours printed out...!


Roll your clay out on the THICKEST setting, use whatever color you choose for the sole, i usually use a brown taupe or natural ivory and let the actual "shoe" be the color part...it looks more lifelike...but FANTASY is good too!!!


I trace around my dolls foot on a piece of paper, adding an extra border so the "shoe fits"!! Then I use a piece of flexible craft plastic and copy the sole onto that..cutting that out ...(this makes a nice template that when tracing around it with your exacto knife, gives you nice support and you can save it for future soles . Follow the pictures.......

So at this point you can just bake them and have a "flat" sole for a ballerina like shoe...or you can take it TWO steps further and add an ARCH and a HEEL.

For the heel. i just jot a line on my "PLASTIC SOLE" and form a littl heel using the line as a guide...i either use one layer of rolled clay or double it. Then cut the heel out with your exacto knife, and place it on the bottom of you sole, blending the clay as smoothly as possible (but dont worry, because you can use your grinder tool to sand it to "perfection"!!!

At this point i work on a little tile so that i can put it in the oven, without disturbing the shape. Now with your heels attached to the sole, use a small dowel, butt it up against the heel and push the sole flat. creating a "lovely" arch!
ok..we are going to part TWO because i'm getting nervous because this is where i lost the whole thing last week!!! Colleen

NY wow

NY wow
dIANE kEELER CLASS

Diane Keeler Class

Diane Keeler Class
Diane Teaching

Diane Keeler class

Diane Keeler class
Class Picture

Sculpting a Childs face

Sculpting a Childs face
My face ..Day 2 ..ready for EARS!

Working on a new face now!!!

Working on a new face now!!!
Completed face and breastplate

Attached head to breastplate

Attached head to breastplate
The clay is very dirty..the cleanest i can get it!

After Face Make up

After Face Make up
WOW...it gives a translucent glow...hid the dirt!

Removable wig...not styled or cut yet

Removable wig...not styled or cut yet
Goat mohair that was dyed and combed

Now she's styled!

Now she's styled!
But it is a wig...it will be glued when i'm ready!!!

Painted Face...still needs brows and lashes!

Painted Face...still needs brows and lashes!
She will be sealed with Duncan flat mat as soon as it comes in the mail!

Cloth Pixie body fit under breast plate...

Cloth Pixie body fit under breast plate...
After drawing and sewing a million body parts....

Girly girl "21" charms

Girly girl "21" charms
Angelica's 21st birthday charms

Devon with his creation

Devon with his creation
Devon and his monkey boy

Devons Doll that he made from a pattern

Devons Doll that he made from a pattern
Monkey Boy

another charm group

another charm group
Debbies Charm

Leapord tube charm

Leapord  tube charm
The diamond shape is a soldered glass bead.

Wax medium melted over polymer clay face....

Wax medium melted over polymer clay face....
She's getting there..i think this hair suits her better..she needs eyelashes and ears

Odd Vintage bug- like Fairy

Odd Vintage bug- like Fairy
Just the idea

Clay Window glazed with Utee

Clay Window glazed with Utee
Stamped Utee glazed "Charms"

Clay Charms

Clay Charms
Making a mold from a charm to make more charms!

Charming

Charming
Clear tubing and stamped Utee

Charming!!! ....REALLY!!!

Charming!!! ....REALLY!!!
Soldered Vintage photos

Charming!!! ....REALLY!!!

Charming!!! ....REALLY!!!
Soldered Charms

Journal Day with Tery and Stephanie

Journal Day with Tery and Stephanie
Creating an Art Journal

Stephanies journal

Stephanies journal
of course..completed first!!

New Art Journal

New Art Journal
Journal made from SCRATCH!!!

Art journal EMBELLISHMENTS

Art journal EMBELLISHMENTS
Clay, Stamps, Utee

Inside cover

Inside cover
Material and free motion stiching

Celeste

Celeste

Celeste up close

Celeste up close
Celestes shirt is made from gessoed and tinted lace with free motion embroidery

EVA

EVA
She is with her new mom Evelyn