Create Clay Hats and Crowns!

Create  Clay Hats and Crowns!

Wednesday, October 19, 2011

"Art Is" class photos and a late start to Halloween!


PUMPKIN HATS made from a marshmallowy bakeable "secret" clay..see below


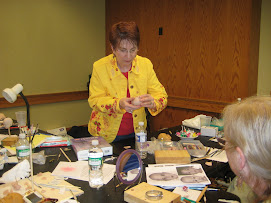
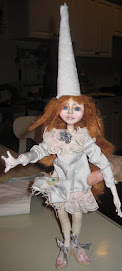
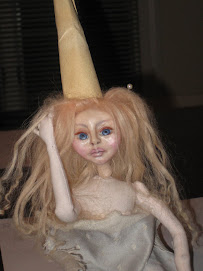
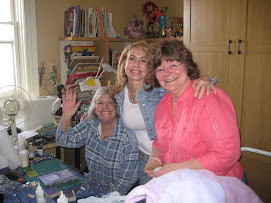
So a couple of photos of my paperclay doll and embellishing workshop at Art is....This was just a "thrilling" class....everyone worked hard for two solid days...the class was filled with amazing mixed media and doll artists ......and a very talented doll Artist helper, Heather Brauner ........Missy Munroe is not in any of the pics as she left a day early,  Sorry Missy!!! 

  Now on to Halloween....not much time.... no more lolligagging.......but two Pumpkin Girls have been started!  My trade this year was a mold and instruction for creating these funky little pumpkins! 
The Mold....Amazingly...I found in the Dollar store!!!!  An Ice cube tray!!!   Wow....best find yet!!!   when I bent the tray in half...the stems ended up going in the same direction, creating a 3d pumkin mold.   I used a pretty cool clay that i had bought a year ago .... I hated it so I so i tossed it aside.  surprisingly it never hardened even though I didnt cover it....what the ????  well I finally read the directions...and what I thought was a marshmallowy air dry clay...is actually a clay THAT MUST BE BAKED....! WOW...IT WORKED BEAUTIFULLY IN THE MOLD AND BAKED SMOOTH AND LIGHT!!!  hooray FOR "PLUFFY".... IN THE KIDS CLAY AT MICHAELS!!!! HAHAH  

Tuesday, September 20, 2011

Cindy Lou dolls done!!! ugh!! On to Halloween Dolls!


Suessical Hairdos!


Ready to be tagged...

Completed Candy Hat


Cleaned, brushed and Dyed Mohair

Preparing for Wigging

Finally....ugh!!!  Cindy Dolls are completed ready for their tags and bags!...Wigging is a time consuming affair for ten dolls....but I think its really the point where they receive their personalities!!!   I mainly use Goat Hair because I love its silkiness and it just seems the most realistic.  Hair has always been an Issue for me!  Four kids in our family, I was the only one that had this huge head of frizz and curls that grew out and up instead of down!  Maybe that is why  I take the time to prepare and beautify the hair ...Just a weirdo thing that is important to me!!!

I buy a whole goat fleece...actually many fleeces of different lengths and textures in a natural color after the "shearing" season.  I have to separate the matted, dirty, smelly!!!  hair into bundles..wash it many times and condition it.  I dye the bundles with regular hair color....and then condition again...and de-matt, trim  and brush ...what a job!!! But I love the results and the ability to have any color and texture hair on hand. 

When the doll is complete, I cover her with plastic wrap and carefully drill the top of her head with my little walnut hollow drill...this is a great drill because it fits in the palm of my hand ...its light and I can control it.  after drilling, I coat the raw paperclay with a tacky glue...and then I start to wig her.......

OK!!!! ON TO HALLOWEEN DOLLS!!!

Saturday, September 10, 2011

Art Is east coast retreat....Whoville Cindy lou dolls...moving along!!!


Whoville Hats.....


Pinwheel Painted.....


Tiny  Shiny  Coats and Sparkly Striped Pants


Cindy Dolls painted ...faced up...

Design Established...Hair will be last.....

So Finally!!!... These dolls are moving along at lightening speed.  Once I just sit and focus...the ideas flow and the outfit comes together. I thought for sure they'd just hang there for another year...but I seem to  work better under pressure...haha (whew!)

Anyway.... I like Candy...so I found these cool swirly mint candy molds (Wilton)....the perfect "TAM" hat for Cindy...When I think of Suess..I think STRIPES!!! and colorful...ugh...

two things that are hard for me...but I was able to put a Pink Candy...glittery shiny "Twist" to the idea...and I'm liking it now.  I Powdered up the candy molds and then used paperclay...trying to "hollow" out a head shape in each candy hat.  When Dried...I drilled a hole so that the armature wire protruding from the dolls head could go through the hat...the I made tiny whipped cream poufs from the same clay...and drilled a hole halfway through, so that it becomes a cap to the hat...hiding the armature wire.
I Created my jacket pattern...and planned it so that i could fit a wire ring inside the jacket bottom to create a crazy suess-like shape....I then created tiny clay buttons...I started from an Idea my friend Sue Milo had using paper....But I'm "More CLAY"!!!   Sue used a tiny embossing folder that has the cutest tiny buttons...she embossed the buttons and punched them out with small circle punches.  I really wanted a thicker button...so i tried "CLAY" in the embossing folder ...WHOA! so cool!!! after baking the buttons...I drilled tiny holes with the smallest drill bit and then pushed silk ribbon through, tying a knot....
The Pants were made from plain pink velvet fabric that I Stamped with a neat line stamp painted with acrylic paint...then I sprinkled with fine angel dust glitter....
Next I painted tiny shiny pink pearl ballet slippers...Gold outline...and I'm working on diamond crystal straps....
Back to work till the next post....

Thursday, August 25, 2011

Oh MY ....END OF SUMMER...BACK TO BLOG.....


Working on "Grinches Cindy dolls"  My Version!! haha

Well....no good computer down the shore....but its the END of SUMMER and back to blogging......I miss all my DOLL FRIENDS...cant wait to see what everyone is up to!!!  Here is whats been going on going on here.....

Getting my paperclay doll class  together for Art is 2011, and creating some suessical dolls for this Grand Event!!!!!!!!!!   So I'm Creating My Version of the Grinches Cindy charachter in a tiny paper clay doll......All the pants are made...a stretch Velvet in light pink that was stamped with a really cool "stripe" stamp that I have...I used mauvy bright pink acrylic paint...after the stripes dried....I painted a layer of fabric medium over  that and then dusted a light coat of light opalescent sparkle...hit it with a heat gun....looks cool....and still stretched right over the dolls legs.....
Her Jacket is a baby pink "SHINY Raincoat "  Fabric.....I'll trim it with this funky faux wild fur in white.  After all the jackets are sewn...wigging is next....then painting tiny "shiny pink patent leather shoes"!!!!


One of my favorite pictures of Cindy from the Grinch Movie


First coat of paint for 10 dolls!


DAy W Dolls...My Charm making Table.....


Me and Maria DWD

Me and Minnie DWD  !!!!


Beginnings of the Grinches Cindy Dolls....Confusing!!!


DAY WITH DOLLS!!!! Our Purple Petal Studio Friends!


Day W Dolls Charm Making Table.....Lots of Fun!


Saturday, May 7, 2011

Linda Misa Class


Face Painted...needs a last coat of shine, and "twinkle" in the eye!


Painting in the works, first coat....black!  Then Flesh...then shading and color!

I chopped her fabric arms and legs...and did them in paperclay...just hard for me to do fabric! haha

Linda Misa's class Doll...realistic face painting...love that little bird!


The gang!


Class dolls in the works!


Here I am with Linda and one of her wonderful creations....

I had the opportunity to take a two day class with Australian doll Artist, linda Misa.
I traveled with one of my best Doll artist friends, Heather Brauner, to Stephanie Novatskies House.  Stephanie is a fantastic cloth doll and mixed media artist..... she wins way too many contests!   She has a great Studio...check it out in the pictures.

Wow..Linda was great....A warm and loving teacher, I connected with her as soon as I met her.  She was ready to tell all....just a fantastic person and teacher. She taught us her cool painting techniques for a more lifelike face using tones, shadows and blending...something that I really wanted to learn and some day master.

  She also showed us a cool bleaching technique to alter any piece of fabric...then continue with painting and free motion embroidery...I'll show that in my next post.....I can only accomplish so much in a day,(well...a couple of days!...hahaha)

I t was a great class with my "family" of doll artist friends....I wish for more times like this one..... 

Saturday, April 30, 2011

Bunny Rabbit Dolly


Coloring bead caps for joints


She is laughing because she is hiding a pink jelly bean in her hand!


yes...yes...I know its wayyyyy after easter! But The doll was completed ...and I got all caught up in family stuff...easter...a high school senior that may or may not graduate....you know...Silly stuff....that could rip your heart out!!!! 

Anyway...I gave the Bunny Dolly to my mom....but I know I will make more animal dollies....it was a cool experience and I didnt have to wig her!!!! 

So..jointing the rabbit , this time I doubled the wire...I added a wire going through the arms and the body, (same for the legs) and then added a decorative bead to the outside of the arms, looped the wire with pliers, then clipped...It really holds the arms and legs to the body and is an added embellishment.  The bead caps were treated with alcohol inks and gilders paste, sealed with matte varnish spray, to give a cool vintage look. I added pink dots with acrylics to pretty blue beads that i had...

Her jelly bean shoes are made out of soft pink dyed leather, premo polymer clay soles (premo is great for the soles because it is very strong...yet has some flexibility.  I
Her  clothes were all dyed with an acrylic paint , mixed with fabric medium and a little walnut ink for that "old " look.....you can see all the lace and ribbons ivory...then after dying...how great is that you can use any one of the magnificent cheap craft paints and make all your fabrics match....WOW.... The tiny jelly beans were made from polymer and varnished.

her easter basket is a silk cocoon dyed with acrylic paint...the chocolate chick is a cheapie plastic chick painted brown...then glossed with triple thick ......the grass is paper towels left over from painting everything!!!!


NY wow

NY wow
dIANE kEELER CLASS

Diane Keeler Class

Diane Keeler Class
Diane Teaching

Diane Keeler class

Diane Keeler class
Class Picture

Sculpting a Childs face

Sculpting a Childs face
My face ..Day 2 ..ready for EARS!

Working on a new face now!!!

Working on a new face now!!!
Completed face and breastplate

Attached head to breastplate

Attached head to breastplate
The clay is very dirty..the cleanest i can get it!

After Face Make up

After Face Make up
WOW...it gives a translucent glow...hid the dirt!

Removable wig...not styled or cut yet

Removable wig...not styled or cut yet
Goat mohair that was dyed and combed

Now she's styled!

Now she's styled!
But it is a wig...it will be glued when i'm ready!!!

Painted Face...still needs brows and lashes!

Painted Face...still needs brows and lashes!
She will be sealed with Duncan flat mat as soon as it comes in the mail!

Cloth Pixie body fit under breast plate...

Cloth Pixie body fit under breast plate...
After drawing and sewing a million body parts....

Girly girl "21" charms

Girly girl "21" charms
Angelica's 21st birthday charms

Devon with his creation

Devon with his creation
Devon and his monkey boy

Devons Doll that he made from a pattern

Devons Doll that he made from a pattern
Monkey Boy

another charm group

another charm group
Debbies Charm

Leapord tube charm

Leapord  tube charm
The diamond shape is a soldered glass bead.

Wax medium melted over polymer clay face....

Wax medium melted over polymer clay face....
She's getting there..i think this hair suits her better..she needs eyelashes and ears

Odd Vintage bug- like Fairy

Odd Vintage bug- like Fairy
Just the idea

Clay Window glazed with Utee

Clay Window glazed with Utee
Stamped Utee glazed "Charms"

Clay Charms

Clay Charms
Making a mold from a charm to make more charms!

Charming

Charming
Clear tubing and stamped Utee

Charming!!! ....REALLY!!!

Charming!!! ....REALLY!!!
Soldered Vintage photos

Charming!!! ....REALLY!!!

Charming!!! ....REALLY!!!
Soldered Charms

Journal Day with Tery and Stephanie

Journal Day with Tery and Stephanie
Creating an Art Journal

Stephanies journal

Stephanies journal
of course..completed first!!

New Art Journal

New Art Journal
Journal made from SCRATCH!!!

Art journal EMBELLISHMENTS

Art journal EMBELLISHMENTS
Clay, Stamps, Utee

Inside cover

Inside cover
Material and free motion stiching

Celeste

Celeste

Celeste up close

Celeste up close
Celestes shirt is made from gessoed and tinted lace with free motion embroidery

EVA

EVA
She is with her new mom Evelyn