Create Clay Hats and Crowns!

Create  Clay Hats and Crowns!

Thursday, February 12, 2009

New hands and the start of a Mohair WIG CAP !


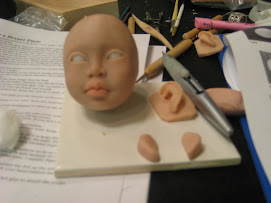
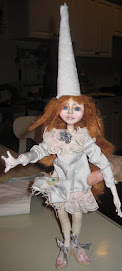
I just couldnt use the original hands...seems a gained a little time, so i redid them...They just didnt feel right! These hands will have a little more expression in them...i have a way to go with hands...absolutely...but i will master THEM! haha

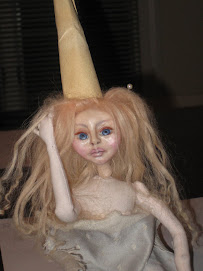
And then I started her wig cap. I learned this technique fron Diane keeler. When the head is finished...take a piece of saran wrap and put it over the head and secure with a rubber band.

Next take fabritac and pour a little on top of her head and smooth it all around with your finger! Then, take a piece of silk guaze or Very thin stretch cotton, and press onto the top of the head over the glue, pressing firmly and forming it around the crown to ears...and down to the nape of the neck.
Spread a little more glue...so it almost looks like a helmet! Let this dry, and then cut it around the head small pointy scissors , cutting around the ears and across the forhead giving a nice hairline! You now have a removable cap that you can apply the hair to in very thin rows and then easily and neatly glue the cap onto the dolls head...it will fit perfect. Remove the dry cap from the plastic and work on a styrofoam egg attached to a stick.

1 comment:

BumbleVee said...

great idea for getting hair onto a doll.... thanks...I'll definitely give this a try.

NY wow

NY wow
dIANE kEELER CLASS

Diane Keeler Class

Diane Keeler Class
Diane Teaching

Diane Keeler class

Diane Keeler class
Class Picture

Sculpting a Childs face

Sculpting a Childs face
My face ..Day 2 ..ready for EARS!

Working on a new face now!!!

Working on a new face now!!!
Completed face and breastplate

Attached head to breastplate

Attached head to breastplate
The clay is very dirty..the cleanest i can get it!

After Face Make up

After Face Make up
WOW...it gives a translucent glow...hid the dirt!

Removable wig...not styled or cut yet

Removable wig...not styled or cut yet
Goat mohair that was dyed and combed

Now she's styled!

Now she's styled!
But it is a wig...it will be glued when i'm ready!!!

Painted Face...still needs brows and lashes!

Painted Face...still needs brows and lashes!
She will be sealed with Duncan flat mat as soon as it comes in the mail!

Cloth Pixie body fit under breast plate...

Cloth Pixie body fit under breast plate...
After drawing and sewing a million body parts....

Girly girl "21" charms

Girly girl "21" charms
Angelica's 21st birthday charms

Devon with his creation

Devon with his creation
Devon and his monkey boy

Devons Doll that he made from a pattern

Devons Doll that he made from a pattern
Monkey Boy

another charm group

another charm group
Debbies Charm

Leapord tube charm

Leapord  tube charm
The diamond shape is a soldered glass bead.

Wax medium melted over polymer clay face....

Wax medium melted over polymer clay face....
She's getting there..i think this hair suits her better..she needs eyelashes and ears

Odd Vintage bug- like Fairy

Odd Vintage bug- like Fairy
Just the idea

Clay Window glazed with Utee

Clay Window glazed with Utee
Stamped Utee glazed "Charms"

Clay Charms

Clay Charms
Making a mold from a charm to make more charms!

Charming

Charming
Clear tubing and stamped Utee

Charming!!! ....REALLY!!!

Charming!!! ....REALLY!!!
Soldered Vintage photos

Charming!!! ....REALLY!!!

Charming!!! ....REALLY!!!
Soldered Charms

Journal Day with Tery and Stephanie

Journal Day with Tery and Stephanie
Creating an Art Journal

Stephanies journal

Stephanies journal
of course..completed first!!

New Art Journal

New Art Journal
Journal made from SCRATCH!!!

Art journal EMBELLISHMENTS

Art journal EMBELLISHMENTS
Clay, Stamps, Utee

Inside cover

Inside cover
Material and free motion stiching

Celeste

Celeste

Celeste up close

Celeste up close
Celestes shirt is made from gessoed and tinted lace with free motion embroidery

EVA

EVA
She is with her new mom Evelyn